


Me (Steve): “Don’t smell it before you try it, just take a chug!”
My friend:*Intensely gazes into the cup in their hand, swirling the liquid around and secretly hoping it will evaporate*
My friend: “So.. uh.. what exactly is this?”
Me: “It’s a combination of green tea, black tea, and sugar that has been fermented for several weeks in that warm kitchen cabinet over there!” *points*
My friend: *Stares at cabinet, then stares at me – eyebrows looking skeptical as ever – as if I’m trying to sell them ocean front property in Nevada*
Me: “Stop smelling it! Just drink it!”
My friend: “OKAY FINE!”
My friend: *Hesitantly brings the cup to their mouth and sips the liquid*
My friend: “You know what! It’s not that bad! It kind of tastes like vinegar but I like it!”
*Twenty minutes and 16 ounces later*
My friend: You got anymore of that cam-bucha?
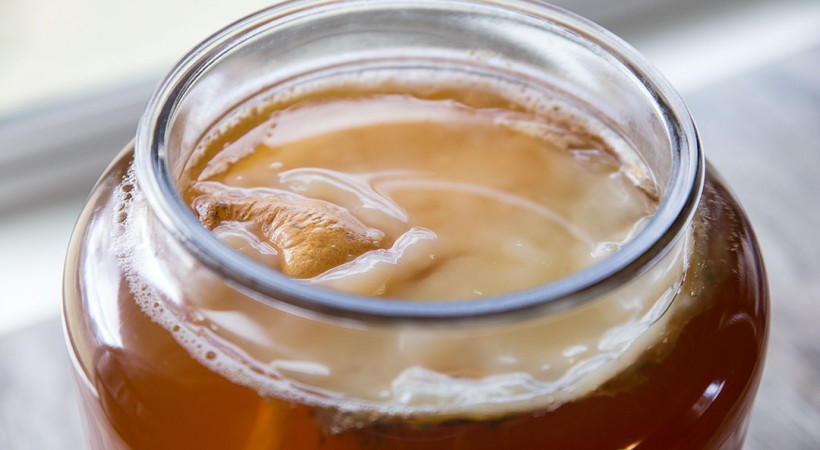
If you’re like my friend, you’re probably wondering what in the world Kombucha tea is. Kombucha (pronounced com-boo-cha) is a fermented beverage made using tea (traditionally, black tea is used – but I prefer using 50% black tea and 50% green tea – I’ll explain why a bit later), sugar, some already made “starter” Kombucha tea, and a SCOBY (Symbiotic Culture Of Bacteria & Yeast) – also known as a mother.
A mother you say? Yes, a mother! As creepy and alien-invasion like as that sounds, don’t worry! I mean, it’s not like there’s going to be a gelatinous inch-thick blob of slime dangling its tentacles into your precious tea, tucked away from sight within the dark confines of that kitchen cabinet you rarely use.
Wait – what’s that you say? That’s actually exactly what brewing Kombucha will be like? Son of a!
But you know what? It’s so worth it! That mother fermenter (along with the starter tea) will essentially feed off the tea and sugar for a couple of weeks, churning out powerful health promoting acids and probiotics (healthy bacteria) in the process. Dr. Axe has a great list of some of the benefits that can come from drinking properly prepared Kombucha, including improved digestion, detoxification, and immune support to name a few. Frankly, I think I’d drink it for the (acquired) taste alone, but the benefits certainly don’t hurt.
There are plenty of good articles online which talk about Kombucha and its associated benefits in more detail, but for the purpose of this blog I mainly want to share my Kombucha brewing secrets with you. I’ve been tinkering with Kombucha for nearly a decade and I think I’ve got it down to an art if I may say so myself. You might even call me the “mother whisperer”. Um.. on second thought, scratch that. *awkward silence*
I’m currently in the habit of brewing a whopping 5 gallons of Kombucha at a time, which seems to be just the right amount to keep me, my wife, and our friends thirst for the “‘booch” quenched. If you’re new to brewing your own Kombucha I’d suggest starting out a bit smaller – perhaps making a gallon for your first go around.
First things first, you’ll need a Kombucha mother (SCOBY) which one of your healthy friends might be able to provide to you – every time you brew a batch of Kombucha, the mother essentially replicates into two! If you don’t have any eccentric friends, you can actually purchase one from eBay (I bet you never thought you’d consider paying a stranger to mail you a blob of bacteria!) or from your local health food store. You’ll also need about 13 ounces of unflavored Kombucha tea to use as a starter.

Here are the steps to brew one gallon of tea:
Step 1: Bring just under a gallon of water (115 ounces if you want to get all science-y) to a boil in a large pot.
Step 2: Turn the heat off, remove the pot from the eye and immediately stir in 1 cup of sugar. You must use sugar – honey, stevia, agave, and other sweeteners won’t feed the mother like plain old sugar will.
Step 3: Immediately add 4 bags of black tea and 4 bags of green tea to your hot sugar water. From what I’ve read, you always want to use at least some (preferably 50% or more) black tea when brewing Kombucha – there’s something about it that mothers can’t resist. You can use all black tea if you like, but I find that adding green tea to the mix smooths out the overall taste of the tea and gives it some extra fizz. I also like using green tea because of its numerous health benefits.
Step 4: After the tea bags have steeped in the sugar water for 5-7 minutes, remove them. Let your mixture sit for an hour or so until the temperature has dropped to 110° F or cooler. Any hotter than 110° F and you’ll risk killing the beneficial cultures. I splurged and bought this awesome thermometer which not only sounds an alarm when your tea reaches a peak temperature, but also sounds an alarm once the tea has cooled down to a set temperature. It’s super useful and takes the guess work out of the equation. It works like a champ for making cheese and yogurt as well.
Step 5: Once the mixture has cooled down to 110° F or less, pour the mixture into a large glass container (metal is said to interfere with the brewing process, and plastic might leach chemicals because of the prolonged contact), then pour 13 ounces of already made Kombucha tea (unflavored) into the mixture and stir (using a plastic or wooden spoon – no metal). Finally, place the mother (SCOBY) into the glass container with the tea.
Step 6: Cover the top of the glass container with a paper towel or a clean cloth (it needs to be able to breath) and secure with a rubber band or string. Place the container in a kitchen cabinet or in some place where it won’t be disturbed often, where it’s dark, and where the ambient temperature is at least 70° F or warmer. Our kitchen gets pretty chilly during the winter, so I invested in a Seedling Heat Mat which I place the Kombucha vessels on top of during brewing. I also purchased a Thermostat for the Heat Mat which allows you to set a desired temperature. I’ve found that brewing my tea at around 74° F yields awesome results. Brewing my Kombucha at a constant and elevated temperature is what took my tea to the next level and I highly recommend the Heat Mat and Thermostat for anyone who wants to do likewise.
Before I had the mat and thermostat, our kitchen temperature typically hovered around 66-68° F during the winter months (brrr) and there were times where my Kombucha still wasn’t done brewing after more than three weeks. Part of me thinks that Kombucha must have originated in San Diego, because it’s so particular about living in that constant 70-75° F range. That, and it’s terrible at driving as well – I kid, I kid! Don’t throw those California grown tomatoes at me!
Step 7: About 12 days later, check up on your Kombucha and give it a taste test. I recommend dipping a plastic spoon into the tea and pouring the spoon into a cup and sampling it that way. Depending on your personal taste and on the temperature of where you’ve been brewing at, your Kombucha may be ready at this point. It should be tangy and almost vinegar like, with a hint of sweetness. If you’re not sure if the tea is ready or not, try sampling it again in two more days. Still not sure? Try waiting two more days. By sampling your first batch of Kombucha at the 12 day, 14 day, and 16 day mark you’ll get a pretty good idea of how long of a fermentation process you prefer for future brews. 14 days at a constant 74 degrees works perfectly for me, every time.
Note: You should never see any mold growing on the mother or in the tea. If you do, throw it all away and start from scratch using a new mother and new tea! I’ve made over a hundred batches of Kombucha and haven’t seen one single spec of mold. In fact, I let a batch ferment for nearly six months once (I was driven by equal parts of laziness and curiosity), and even then there wasn’t a spec of mold. The mother was about 6″ thick though! It’s something to be aware of though.
Step 8: Once the Kombucha has fermented to your liking, remove the mother (using clean hands) and place it on a clean plate. Give the Kombucha tea a few stirs with a plastic spoon, then pour about 10% of the tea into a glass jar so that you can use it as starter tea for the next batch of Kombucha (which you should plan on starting the same day that you’re collecting your now finished batch).
Step 9: If you’re a minimalist, you can now pour the remaining Kombucha into glass jars (with tight fitting lids to preserve some of that naturally occurring carbonation) and store them in your fridge, ready to drink. I find that pint size mason jars work perfectly. Give the large glass container that your Kombucha was brewing in a good washing, and start the process all over again.
OR! If you want to thrill your taste buds and master the art of Kom-Foo, I suggest flavoring your Kombucha with fruit juice for that extra wow factor. It’s quite fun experimenting with different flavors of Kombucha and I don’t think I’ve found one that I haven’t liked yet.
If you’re going to flavor your Kombucha, I recommend pouring it into a gallon pitcher (plastic is fine, since it’ll only be in the pitcher for a minute or two), and then stirring in 1.5 Cups of any of the following juices: Pineapple/Mango Juice, Grape Juice, Pomegranate Juice, Apple Juice, Cranberry Juice, Dark Cherry Juice, and the list goes on – feel free to exercise your creativity here. I prefer the R.W. Knudsen brand of juices which can be found in most any health food store and in plenty of mainstream grocery stores, but any good quality juice should be fine.
Another great option is to order fruit juice concentrates from Vitacost.com. Some of my favorites include the Organic Tart Cherry Juice Concentrate, the Pure Pomegranate Juice Concentrate, the Pure Cranberry Juice Concentrate, and the Black Cherry Concentrate Blend. Since these are concentrates you’ll only need about 1/2 to 3/4 of a Cup to flavor a gallon of Kombucha. This makes the concentrates a bit more economical than the juice – especially if you grab a couple of bottles during one of Vitacost’s buy one get one 50% off sales. You can even add a few drops of liquid Stevia to your Kombucha while flavoring it if you want some extra sweetness. I find that the Cranberry concentrate tastes best with a bit of Stevia added to the mix.
Step 10: Invite a good friend over and try to convince them to taste your delicious Kombucha tea, while insisting that they not give it a whiff first.
I hope that helps. May your brews ever be delicious! Feel free to leave a comment if you have any questions or tips of your own.
P.S. Here’s what 5 gallons (two 2.5 gallon containers) of glorious Kombucha looks like:

Why thank you for the love!
Thanks for being the first comment EVER! 🙂
I immediately had a good laugh …my husband is one who has to smell first…I like your approach. This is very informative, I am just starting to make my own…felt a bit overwhelming from so many different ways but this give me confidence.what is your experience with 2nd fermentations…do you always store your Kombucha in the refrigerator? Do you know at what point it start to contain alcohol?
Hi Melanie, I’m glad you got a laugh out of it! I’ve found that second fermentations can help give you that extra fizz (which I love) by allowing the carbonation to build up. If you’re planning on doing a second fermentation, I’d suggest cutting your typical fermentation time down by two days – so if you normally ferment Kombucha for 14 days, try 12 instead (since you’ll make up those 2 days during the second fermentation).
So after 12 days, you’d add the flavoring of your choice to the Kombucha (but don’t flavor the “starter” Kombucha that you’ll need to set aside for the next batch that you brew), then you’d pour the flavored Kombucha into individual bottles or jars (I prefer pint size mason jars), screw on tight fitting lids and let the Kombucha sit at room temperature for about 2 days – then put the bottles or jars in the fridge and enjoy! I always refrigerate my Kombucha once the fermentation process is complete.
I don’t know the exact point at which Kombucha starts to contain alcohol, but I don’t imagine you’d have a whole lot of alcohol if you kept fermentation to two weeks. There will almost certainly be trace amounts present, but I don’t think it’d be significant.
After tasting your kombucha so many times, I think I’ll finally try making my own. Add an affiliate link to those huge glass jars.
Great info. Do you have to use green our black tea? Could I use Chai or Lemon Zinger teas as well?
Thanks Lisa! If you’re new to brewing Kombucha I would recommend sticking with using black tea, or a 50/50 blend of black and green tea. From what I’ve read, many herbs and spices (such as the ones found in Chai) have natural antibacterial properties, which could potentially hinder the growth of the beneficial Kombucha bacteria.
However, once you’ve mastered traditional black/green tea Kombucha, you could experiment with more exotic tea blends – because I do know that it’s possible to use many different kinds of tea. There’s a company called Brew Dr. and they are quite unique in that they flavor their Kombucha by using various types of tea during the fermentation process, rather than adding fruit juices AFTER fermentation is already complete – which is what most companies do. Maybe taking a look at their lineup of flavors would give you some ideas and inspiration: http://brewdrkombucha.com/raw-organic-kombucha/
Hope that helps. Happy brewing!